

Let’s Replace ALL the Interior Doors!
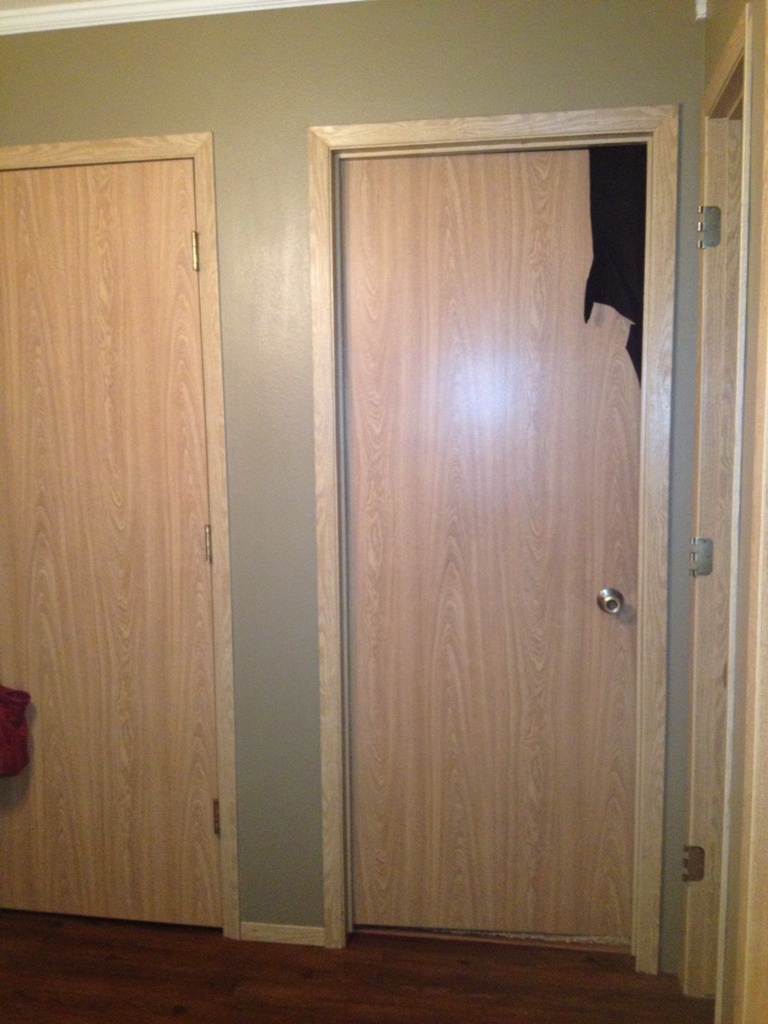
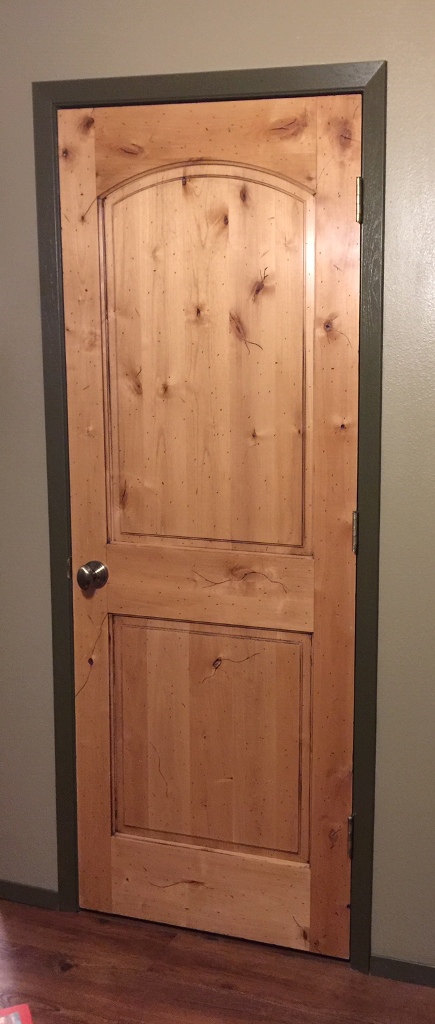
Are you happy with the doors inside your home? If so, you probably have a custom-built home. For those of us who bought a track-style home, the interior doors are pretty plain. The doors in our home were hollow core ones with an oak look and were just fine. That is until I saw the new upgraded panel doors mom had installed in her home! It is the home that I grew up in. I asked her about the price but can’t remember how much she said she spent to have them replaced. I do remember that it was more than I thought I’d spend just to get a new look in my home….but then, my home is not 60 years old either. I’m happy she replaced the old doors in our family home, they look awesome!
Original doors
Inspiration
After seeing how great mom’s new doors looked, I did a little casual research to see what it might cost to have our doors replaced. We have 10 interior doors. There are actually 11 doorways but I removed the door to the laundry room since the room is so small; it didn’t make sense to have a door taking up extra space. I looked online and also went to both Lowes and Home Depot and saw that the price per door was between $119 and $135. After doing the math using the lowest cost per solid core 6-panel door: 10 doors @ $119 = $1190.00, I decided that unless I could find some 2nd hand doors at a better price, my oak-look doors would continue to be just fine.
I’m a big believer in reusing supplies, furniture, clothing, etc and I love to shop at stores that sell 2nd hand building supplies such as: Habitat, Overstock Building Supplies, The Ugly Duck. One day as I was browsing through Habitat looking for tile supplies, I noticed several nice solid core doors for $10 each! I couldn’t believe they were so inexpensive! My interest in replacing my interior doors was renewed! I rushed home to take measurements of the doors.
Finding new doors
Did you know that interior doors are not all the same size?! Upstairs, the bedroom, office, bathroom doors are 29 5/8″; the hall closet is 29 1/2″. Downstairs, the bedroom doors are 29 3/4″, the bathroom door is 29 1/2″ and the hall closet is 30″. The pantry and linen closet are each 17 3/4″. I wrote down the measurements and tucked them into my purse for the next time I went to Habitat.
A few weeks later, I was back in Habitat. Much to my surprise & delight, I was able to find the right sizes for all the doors in the house! I found 3 matching 6-panel solid core doors for main doors in the upstairs hall – master bedroom, office, bathroom. I couldn’t find a 30″ 6-panel door for the upstairs hall but did find a knotty pine wood one for only $45!! Score! Home Depot has one like it for $240! The doors I found for the pantry and linen closet were different but I liked both styles so I bought those too.
Choosing styles
For the downstairs, I went with a different look since they didn’t have any 6-panel doors in the sizes that I needed. I ended up with 3 styles between the 4 doors. The two I found for the bedrooms are the same style while the hall closet and bathroom doors are each different. I actually like that they don’t all match, it gives a nice eclectic look in the downstairs hallway.
So, for ALL 10 doors, I spent $135 – basically the cost of buying one new door!
Once I had them all picked out, a call to hubby was needed to load them in the Tacoma to bring them to their new home as they wouldn’t fit in my little Rav4.

Took this pic for my son
who lives in Canada
This is when I first realized
the hinges were not all the same
Trying to make them fit
Now that I had the doors home, it was time to figure out how to hang them. In my naivety, I figured I’d unscrew the hinges, remove a door then screw in the hinges to the new door, and voila! be done easy peasy. But, alas, it was not to be easy peasy. What I didn’t know was how important it is to check the existing hinge location on the new door. What I discovered on all 6 of the upstairs doors was that the hinge locations would need to be altered. All the doors with the exception of the pantry & linen closet had hinges that were made for doors that opened opposite of the ones I was replacing!!! The pantry and linen closet hinges were the right location for opening the doors but not spaced exactly where I needed them to be.
Fixing the hinges
What that meant was that I was going to have to chisel out the hinge area, changing each from your standard hinge shape – kinda like a rounded rectangle to a squared rectangle. I also needed to drill new holes for the placement of the screws. Much more work than I had envisioned. The top hinge on the pantry door was off by just a tad, so less chilsing went into fixing that one. I used wood putty on most of the doors to fill in where I had chiseled new hinge spots and even though the pictures make them look less than perfect, no one would know unless they were looking closely or unless I actually point them out which is what I did a few times when the project was new. Now that I see these pics, I do think that I need to clean the paint off of them.

Example of upstairs hall doors 
Hall closet 
Downstairs bath 
Pantry door 
Inside linen closet
Downstairs
The downstairs door refab was a little bit easier, the hinges on the bath and hall doors each needed to be chiseled but both of the two-bedroom doors fit hinge-wise. However, those doors were too tall and we needed to use the skill saw to shorten them (I asked hubby to do this task since I was new to using a skill saw at the time). After measuring for the new length, I applied painter’s tape to mark where we needed to cut. I also wrote arrows on the tape to make sure we didn’t cut the wrong side (although it was pretty obvious which side was the correct one. I was surprised, actually, that the skill saw cut them so quickly and smoothly. It helped that they are solid core doors. I’m not even sure if cutting the hollow core would work.

Measured and taped 
Both doors ready to cut 
Shortening door 
Fits perfectly
Although there was less hinge-fix work on these doors, the latches on the door jams to the downstairs bedrooms were a different story. It appeared that when the doors were initially installed, they were hung upside down as the doorknobs were higher than normal which meant that the latch holes were higher than needed. Yes, I could have hung the doors upside down but then the pattern on the doors would be obviously wrong….or that’s what I thought at the time. So, I used wood putty to fill in the existing holes and then chiseled new ones. I became quite adept with my chisel set by the time I was done installing the new doors.

New spot marked 
Chiseled latch area 
New latch area
Upstairs
I painted the upstairs hall doors once I had them hung. I decided to leave them white and just add a fresh coat of paint. Of course, the knotty pine one was left as is. The pantry door was painted using the same color as the cabinets, Behr Chocolate Cupcake, and painted it prior to hanging.
Finished upstairs doors

Linen door removed 
Bath door complete 
Bath, Office, Linen doors 
Linen, Bedroom, Hall doors 
Two coats on pantry door 
Pantry door hung
Since the paint in the downstairs hall was a warm, Tuscany color, I decided not to leave them white; instead, I chose a nice, deep red for the exterior of the doors. The inside of the bedroom doors was painted Behr Chocolate Cupcake and the inside of the bathroom door was painted brown. I hung the doors first, then took them down to paint them. I’ll admit that hanging them the 2nd time was more challenging than I thought it would be.

Downstairs bedroom doors 
Bathroom door 
Choosing the right color
Painting areas
To paint all the doors, I set up 3 folding tables, one in the family room and two in the living room, I also used the dining table. I had doors everywhere! I’ve since replaced the trim in the downstairs bathroom and changed the paint color on the inside of that door. I’ve also repainted the pantry door and the trim around it. I’ll have information on those projects in another post.

Bathroom door primed 
Outside color
bathroom door
Inside color
bathroom door

Bedroom door primed 
Inside color bedroom door 
Outside color
bedroom door
2nd bedroom door 
2nd bedroom door
Doorknobs
Instead of buying new doorknobs, I used bronze spray paint to change them from the shiny brass they were to a color I preferred. The door handle from Montreal is one my son gave me. I love it so much and it looks great against the red of the downstairs hall door!
Finished downstairs doors

Bathroom door exterior 
Bathroom door interior 
Bedroom door 
Bedroom doors

Brass door knob from Montreal 
Hall door
Hanging doors is a skill I quickly came to realize that I did not possess and yet, with much determination, I was able to complete the project!

If this sounds like too much work for you, I understand. But I’m also convinced that if I could do it, you can do it! Recently, I’ve been seeing tutorials with ideas on updating your doors using wood trim. That is an option for replacing the doors. For me, though, I’m glad I was able to replace the hollow core ones with a solid core. They are heavier doors so they keep the rooms quieter. If you do update your doors, please let me know in the comments!

Let’s Stay in Touch!
I’m excited to share more projects with you as well as tips/tricks/freebies! Just enter your email below to be one of my Blog Peeps!


