

Let’s Make a Baby Gift!
Going to a baby shower, birthday party, or is it Christmas? Do you need a gift for a baby? Below are instructions for making a ‘Lovey’. This craft is quick and easy. I figure it takes me about 1/2 an hour to create one. (Now, if you just adore this little Lovey but don’t sew or sew but don’t want to create one at this time, you can find them with this link) This small item made with fabric and ribbons for little ones to snuggle. The ribbons provide texture for little fingers and mouths to experience and the soft fabric can be soothing when snuggled. Toddlers can easily carry them around. Having extra loveys is a good idea – one for the stroller, car seat, bedroom, etc. When my first baby was little, I remember my Pediatrician telling me that it is a sign of emotional maturity when your baby develops an attachment to an object such as a small stuffed animal or piece of cloth.
Supplies Needed
- 2 pieces of soft fabric no smaller than 8″ x 10″ each
- Ribbon of varying widths and textures
- Cutting board (*optional)
- Cutting ruler
- Rotary cutter
- Thread
- Scissors
- Sewing pins
- Sewing machine
- Iron & pressing cloth
A little history
I distinctly remember my Lovey. Mom tells me that my paternal grandpa made the first one for me. He took one of the large, thin diapers, folded it, and rolled it into a cylinder shape. Then he put a rubber band around it to keep the shape and placed the band about 2 inches from the top. After that, he used a pencil to draw eyes and a mouth on it to create a face. It was called my diaper doll and I loved it! Mom says that one day while we were at my grandparents’ house, I kept ‘losing’ my Lovey and grandpa would make a new one. At one point, they followed me to see how I kept losing them and found that I was storing them in a closet. When our first grandbabe was born, I figured I’d pass along the tradition and made her a diaper doll Lovey. While she enjoyed it, she didn’t build the same kind of attachment to it that I had with mine – drat!
The inspiration
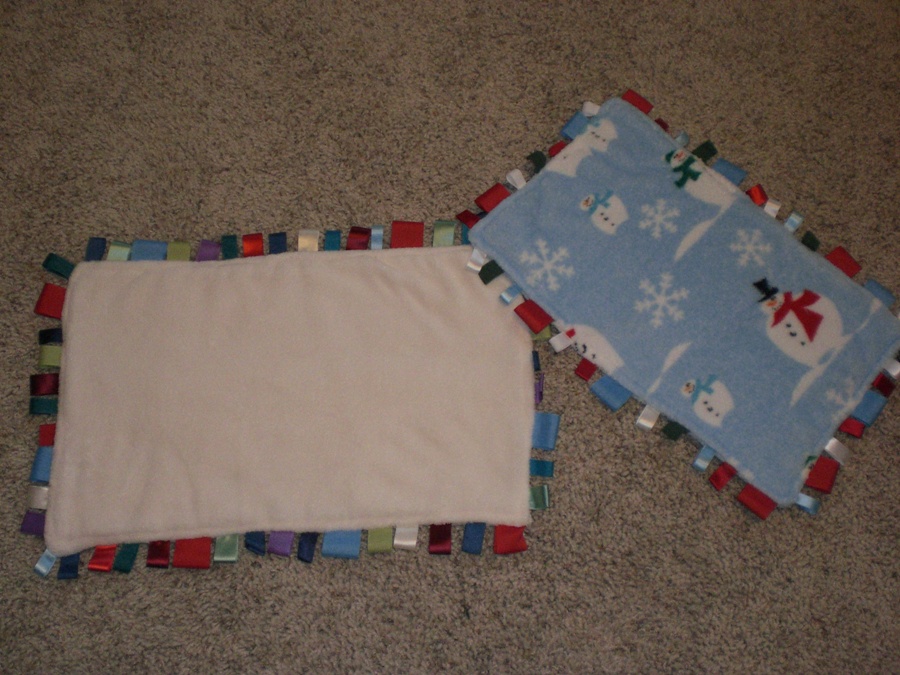
But I digress. Back to the gift idea…..I found this gift idea when we were expecting grandbabe #1. I had been looking around to see what was new for babies and in a local specialty baby boutique, I found Taggies. They were made from flannel and were approximately 8″ x 10″. The ribbon that was sewn into all four sides was a variety of sizes and textures – satin, grosgrain, wide, narrow. The ribbon had been folded in half before being sewn between the front and back pieces of fabric. I was not buying yet for baby things but kept this little goodie in mind for the future.
Options
Over the years, I have made several of these little Loveys for my grandbabes, great nieces & nephews, and friends grandbabes. I love that they are quick to make and don’t take much in the way of fabric or ribbon. If you are a seamstress, there’s a good chance you have lots of left over fabric and ribbon laying around. If you aren’t or don’t have extra fabric you can always buy some at the fabric store, use a pillow case or visit a thrift shop for pillow cases, towels, flannel shirts….use your imagination! Any soft fabric will work for these gifts: flannel, polar fleece, minky, terry cloth. I usually make mine around the same size as the original one I saw – 8″ x 10″ but you can make them any size you want. A blanket size would be nice too.

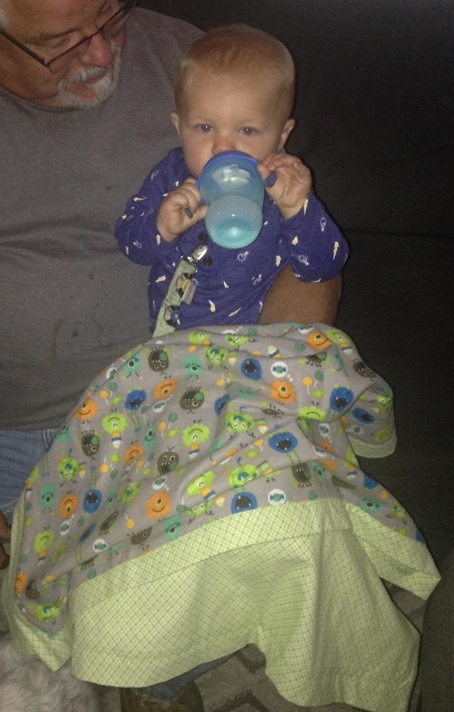
The most recent Lovey I’ve made was for our newest neighbor who was pregnant with her first baby. I knew I had lots of ribbon and quite a few small pieces of flannel that were left over from baby blankets I had made for grandbabes, great-nieces, and great-nephews. Below are pictures of these blankets. I’ll get around to writing a post and tutorial for those also. They are fun to make and I’ve been told that they have become precious to my great nieces – that just warms my heart! My grandbabes, who aren’t so little anymore, keep theirs on their beds.
The fabric I chose for my neighbor was a bright, floral flannel leftover from the blanket pictured above. I made the blanket for a Christmas gift last year for one of my 6-year-old great-nieces. I’ve made a few of them for her and her twin sister. The pictures below are the twins with their first flannel blankets and their brother with his from last Christmas.

Cutting fabric & ribbon

The first decision I needed to make for the gift was the size that I wanted the Lovey to be. That decision was easy since I was using leftover scraps of material. I ended up with two 9″ x 13″ ish pieces from the flannel scraps. After I had my size, it was time to determine how many pieces of ribbon I would need. I usually space the ribbon between 1/2″ and an inch apart along all four sides. You can use more or less and space the ribbon farther apart if you wish. Then, I started cutting 3″ – 4″ pieces of ribbon in coordinating colors in a variety of sizes and textures.
Sewing the lovey

When I had enough ribbon pieces, it was time to assemble the Lovey. Since I have made several of these, I just fold the ribbon wrong sides together and sew it to the fabric as I go – I no longer pin them first. If you are making your first one, you may find it easier to pin all the ribbon to the fabric first, then start sewing.
After sewing all the ribbon to the fabric with a basting stitch, I pinned the two pieces of fabric right sides together with the stitching on the top. Be sure you are sewing over the first line of stitching as it will keep you from missing where the ribbon is sewn. I used a darker color thread so you can see it in the pictures easier than if I had used white. Leave an opening for turning your fabric. If you are using flannel, the opening does not need to be very large; if you are using terry cloth or polar fleece, you would want a larger opening as those fabrics are bulkier. I decided to round the corners for this Lovey but you can leave them square if you prefer. After the front and back were sewn together, I trimmed the seam to reduce bulk and turned the piece right side out. At this point, you can hand stitch the opening to close it or sew it with the machine as I did. Be sure to sew the opening as close to the edges as possible.

Pin right sides together 
Leave opening for turning 
Stitched with opening to turn 
Close-up of opening 
Trim excess fabric 
Pin opening to sew shut 
Stitch close to the edge 
Opening stitched
Finishing steps
Now that the Lovey was sewn together, I used a hot iron to press it to remove wrinkles and prepare for topstitching. Don’t forget to use a pressing cloth to prevent any of the ribbon from being damaged. I didn’t wet my cloth but you could use a damp one if you wanted to. After pressing, I top-stitched 1/4″ from the edge. Topstitching helps secure the ribbon as well as giving a nice, finished look. I used a light color to stitch this one shut, but it’s fun to use a nice, bright color too.

Lovey before being pressed 
Top stitching 1/4″ from edge 
Finished Lovey
Instructions for Lovey
- Choose fabric: Flannel, terry cloth, polar fleece,
minky - Cut two pieces of fabric in the size of your choice
- Cut 3 –
4 inch strips of ribbon. You will want to place the ribbon every 1/2 inch or so around the four sides of the Lovey - Fold each ribbon in 1/2
- Pin ribbon to the right side of one of the fabric pieces
- Baste the ribbon in place
- Pin the two pieces of fabric right sides together with ribbon between them. Place the piece of fabric that has the ribbon sewn to it on top so you can see the baste stitching – this will be your guide when stitching the two pieces together
- Follow your basting line and stitch the two sides together with a 1/4″ edge, leaving an opening of about 2″ for turning
- Turn right side out and trim the
seam - Pin the opening closed and stitch either by hand or machine
- Using a pressing cloth to protect the ribbon, press Lovely with your
iron - Topstitch 1/4″ from edge to secure the ribbon and give the Lovey a finished look
Let me know what you think
This sounds like a long process, but it truly isn’t. If you make one, please comment and share your handiwork! The finished size of this Lovey is 9″ x 12″ – a perfect size to be carried and snuggled!
If you need supplies
This post contains Amazon affiliate links. If you choose to order through these links, it will be at no extra cost to you


Sign up for project ideas!

Let’s Stay in Touch!
I’m excited to share more projects with you as well as tips/tricks/freebies! Just enter your email below to be one of my Blog Peeps!


You May Also Like

Let’s Make a Self-Binding Blanket!

Let’s Repair then Replace the Silverware Drawer!

